How to Make UV DTF Transfers: A Step-by-Step Guide
UV DTF transfers have revolutionized the custom print industry by offering you amazing flexibility and expert print quality. Whether you want to begin designing your own custom DTF transfers and expand your DTF transfers wholesale business, mastering the UV DTF process is the key to success.
So, how exactly do you create UV DTF transfers? It’s easier than you may think. UV DTF (Ultraviolet Direct-to-Film) transfers are made by printing UV-curable inks onto an A film, laying a clear adhesive B film on top of it, and curing everything with UV light. This results in a long-lasting, waterproof transfer that you can apply to almost any surface immediately.
What is a UV DTF Transfer?
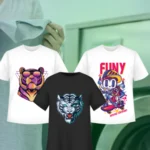
UV DTF transfers are basically premium vinyl stickers, with UV curable ink printed on a special transfer media. What is great about this type of printing is that these transfers are easy to make and unlike the conventional heat transfer that requires heat and pressure, UV DTF transfers are not the same. You can print them on glass, metal, wood, plastic and even fabric without using heat.
How UV DTF Works
You begin by printing your design with UV inks onto what’s known as an A film. You then use a clear B film, which serves as the adhesive layer. Then you cure the whole thing using UV light, creating a piece that’s both waterproof and durable. And as soon as it is cured, it’s good to go.
When you look at the benefits, the process is actually kind of amazing. No heat press is required, meaning you don’t have any temperature settings to worry about. These transfers, which work on just about any surface, are both waterproof and fade resistant.
What You Will Need Before You Start
If you’re just learning how to do UV DTF transfers, you don’t have to invest a lot right out of the gate to get started, but you should have the right equipment and materials to ensure professional results.
Equipment
At the center of your UV DTF printer arrangement is a printer that is compatible. You’ll either require an Epson L1800, L805 or a UV DTF printer that can support UV-curable inks. Average inkjet printers just can’t do the job, as they lack the capacity to support those special UV inks that make the process work.
Next, you’re going to want to get a UV curing light, which is essentially a specialty LED lamp. Find one that operates at a wavelength between 395-405nm with a power of 36 watts. The trick is to have even light in your entire print area as hot or cool areas will result in uneven curing and poor results.
There’s more than one way to cut your transfers. A sharp craft knife will do the trick for a simple design, but if this is something you’ll be doing consistently or with more complicated shapes, you’ll appreciate a vinyl cutter that’ll save you time and give you cleaner edges. Don’t forget a quality cutting mat and some weeding tools for close work.
Finally, you’ll need application tools. Have a good squeegee for smooth application, and plenty of cleaning cloths and isopropyl alcohol for surface preparation. Good adhesion depends on clean surfaces.
Materials
The materials you buy are just as important as the equipment. Your A film should be about 0.75mm thick with a glossy finish to give you the best print quality and ink adhesion. The B film is your clear adhesive layer that makes everything stick.
You absolutely must use UV DTF-specific inks. Regular UV inks might seem like they’ll work, but they won’t give you the durability and adhesion you need. Quality UV DTF inks are specially formulated to work with these films and create prints that last for years.
Workplace Setup
Your workspace doesn’t have to be fancy, but it does have to be right. One key is cleanliness, as dust and microscopic particles can spoil the quality of your print. UV inks require good ventilation, ensuring you have enough air circulating. Do not print directly in the sunlight to ensure the best results.
Store your films flat, protected from dust. Temperature also plays a role, and you’ll want to keep your workspace between 65-75°F for optimal ink performance. Too hot, or too cold, and your inks won’t work correctly.
Step-by-Step: How to Make UV DTF Transfers
Now let’s get into the actual process. Follow these steps carefully, and you’ll be making professional-quality transfers in no time.
Step 1: Design Your Artwork
Your design is the place where all of it begins, so it’s definitely worth getting this right. You’ll probably want to work at at least 300 DPI, to get a nice crisp level of detail that will not look pixelated when printed. Use CMYK over RGB mode for better results, as it has a larger scope than RGB and its results are more accurate according to what you see on the screen.
If you’re looking for the highest quality, we also recommend creating a PDF, PNG, or TIF format file. When you design, keep your final application size in mind and don’t neglect to incorporate a white backing layer if you are applying to transparent or dark surfaces.
Make sure to mirror or flip your design horizontally before printing. UV DTF prints face down during application, and if you don’t reverse your design all the text will be backwards.
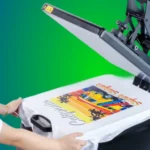
Step 2: Load the A Film into the Printer
Loading the film properly prevents jams and ensures smooth, consistent printing. Start by cleaning your printer thoroughly to remove any dust or debris that could cause print quality issues.
A film thickness is usually at 0.75mm shift your paper guides to match it. Insert the film with the shiny side down toward the print heads. This seems counter-intuitive, but the glossy side is actually your print side.
Before you initiate your first print job, do a test feed to ensure the film advances smoothly, without catching or skewing. Hold the A film only by the edges to avoid fingerprints, and ensure that the film is completely flat in the printer.
Step 3: Print the Design
The right print settings are vital for vibrant, long lasting results. Use the highest print quality your printer supports, adjusting ink density to 100% and lower print speed for the best quality. Use your UV DTF color profile if you have one as these will produce the most accurate colors.
Begin your print job and watch the first couple of inches closely. Inspect for correct ink lay-down and any nozzle issues that could result in streaking or banding. If you detect issues, pause and clean the heads before proceeding. When you are done printing, make sure you let it dry before you handle it. Getting impatient before letting it dry can cause your print to smear.
Step 4: Apply the B Film
The B film application is where your transfer really comes together. Begin by wiping your print surface with a damp cloth to get rid of any dust or particles, which may interfere with adhesion.
Slowly removing the B film backing to avoid trapping air. Overlap your way to one end, using your squeegee to flatten it as you work. Smooth out any air bubbles right away as they’re infinitely more difficult to eliminate if the film has completely set.
Press hard to make sure there is good adhesion everywhere. Inspect for bubbles between A and B films, ensure all edges are sealed, and ensure a smooth, wrinkle-free application.
Step 5: Cut the Transfer
Precise cutting makes the difference between amateur and professional-looking results. If you’re cutting by hand, use a sharp blade as dull blades will tear your films and create ragged edges. Cut slightly outside your design to leave a small border, and follow the contours of shaped transfers carefully.
If you have access to a cutting machine, you’ll get much more consistent results, especially for complex shapes or large production runs. Machine cutting provides the crisp, professional edge quality customers expect.
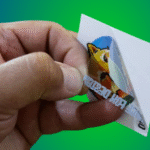
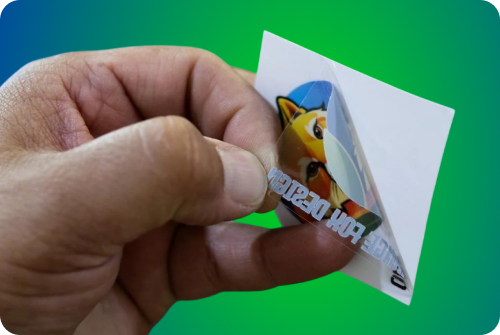
Step 6: Peel and Apply
This last step is where your transfer either works or doesn’t. Surface prep is absolutely critical so be sure your application surface is cleaned with isopropyl alcohol and is dry before applying your transfer.
Make sure your transfer is lined up; getting it straight is important, especially if you are using text or a detailed design. Peel back slowly applying pressure making sure you go side to side with the squeegee on the exposed transfer. Work any bubbles out right away and apply uniform, hard pressure over the entire transfer.
Pro Tips for Best Results
Making high-quality UV DTF transfers will depend not only on attention to detail but also a few tricks of the trade already known to many through trial and error.
Color management can make or break your results. Calibrate your monitor so you’re getting accurate colors and, if they’re available, use ICC profiles for your printer and ink combination. Always run color test swatches before running a big production order, because what looks great on screen doesn’t necessarily look good in print.
Film handling is another area where small details make big differences. Store your films vertically to prevent curling, and control humidity in your workspace since excessive moisture affects adhesion. Be sure to handle films properly with clean and dry hands and use within the manufacturer’s guidelines for best results.
The same lighting should be used when comparing colors. Colors can appear drastically different under different lights so set a standard viewing condition and stick to it.
Common Mistakes and How to Avoid Them
It is a lot cheaper to learn from the mistakes of others than from your own. Here’s a look at the most common issues beginners run into and how to avoid them.
Film orientation mistakes are also the most annoying error because you don’t realize until after you’ve printed. If this isn’t the correct side that makes them interchangeable, nothing will stick and you have wasted both time and material.
A frequently occurring problem is rushing the time you take to cure. It’s so tempting to want to rush this process because of the excitement to see your creation, but if it’s not fully cured, you drastically cut down on its durability and run into adhesion problems. Obsessively adhere to manufacturers’ set cure times.
Dirty film leads to all sorts of print quality and adhesion problems. Even fingers that look clean have oils that can disrupt inks and adhesion. Keep your films looking fresh by using clean gloves and appropriate storage!
Using wrong ink settings is an expensive mistake. Standard DTF settings won’t work for UV DTF – you need UV DTF-specific printer profiles to get proper color reproduction and durability.
Poor surface preparation probably accounts for more transfer failures than anything else. Dirty or oily surfaces simply won’t hold transfers properly. Always clean with isopropyl alcohol first, no matter how clean the surface looks.
UV DTF vs. Other Printing Methods
Understanding when to choose UV DTF over other methods helps you make smart production decisions and offer the right solutions to your customers.
UV DTF is great especially on multi-material projects like this that you need one solution that works across everything. If a client wishes to put the same design on t-shirts, water bottles and wooden signs, UV DTF is capable of all three looking the same and of identical quality.
When it comes to small to medium quantity runs with fast turns UV DTF is tough to beat. Start-up cost is a bit higher than the other ways, but the speed and versatility of this way of animating usually make it worth the investment.
Complex, full-color designs with fine details are another area where UV DTF excels. The print quality rivals traditional methods while offering more flexibility.
Care and Maintenance of UV DTF Transfers
Proper care extends the life of your transfers and keeps them looking professional for years.
For hard surfaces like glass, metal, and plastic, gentle cleaning with mild soap and water works best. Do not use abrasive cleaners which may scratch the transfer surface and use only soft cloths. Whenever you can, shield transfers from large temperature differences since this generates stress with the adhesive.
Fabric applications need a bit more attention. Tumble dry on low-iron on any easily ironed material-or iron on low on the back side. Wash cold water only-inside out to protect the transfer area. Air drying is best, but if you have to use a dryer, use low heat. Do not dry clean or bleach UV DTF transfers.
If you have unused transfers, store them properly to maintain their adhesive qualities. Store them in a cool, dry area and out of direct sunlight, and lay them flat to prevent curling or bending. They should be used within six months for best adhesion, and, if you’re stacking several transfers, kept apart by release paper.
Conclusions
UV direct to film transfers are extremely versatile for those in the custom printing industry. So by using these instructions, you will learn everything you need in order to start to design and make professional transfers that sticks every time and leaves your customers speechless due to its amazing color quality and durability.
The basic success factors really are simple, use good materials and equipment, apply with care, keep everything clean and tidy and handle as you should, know what you should be doing to prepare your surface and look after your work properly.
If you’re producing custom DTF transfers for your existing customers, or researching DTF transfers wholesale print opportunities, excelling at UV DTF also means new business opportunities and happier customers.
FAQs
Can I make UV DTF transfers without a UV printer?
Unfortunately, no. UV DTF transfers specifically require a printer that can use UV-curable inks. Regular inkjet printers with standard inks simply won't create the durable, waterproof qualities that make UV DTF transfers special. The good news is that many Epson printers can be converted for UV DTF use with the right ink systems and modifications.
How long do UV DTF transfers last?
With proper application and care, UV DTF transfers typically last 3-5 years outdoors and can last indefinitely indoors. The actual lifespan depends on factors like surface type, environmental conditions, and how well they were applied. Indoor applications on smooth surfaces often exceed 5 years, while outdoor applications may show some fading after 3 years of direct sun exposure.
Are UV DTF transfers dishwasher safe?
Yes, when properly applied to hard surfaces like glass and ceramic, UV DTF transfers are dishwasher safe. Use gentle cycles with mild detergent and avoid heated dry settings for best results. While hand washing is recommended for longevity, normal dishwasher use won't damage well-adhered transfers.
Can you remove UV DTF transfers?
UV DTF transfers can be removed, though it may take some effort depending on the surface and how long they've been applied. Fresh transfers on smooth surfaces usually peel off more easily, while older transfers might need heat application or adhesive remover.
Can you put UV DTF transfers on fabric?
Absolutely! UV DTF transfers work wonderfully on fabric and don't require any heat press application. Simply clean the fabric surface, apply the transfer with firm, even pressure, and remove the backing. The transfer adheres immediately and will withstand normal washing when proper care instructions are followed.