How to Heat Press DTF Transfers

Heat pressing DTF transfers is a straightforward yet transformative process that turns your creative designs into vibrant, durable custom apparel. Whether you’re a business owner producing branded merchandise, a hobbyist crafting personalized gifts, or someone new to direct-to-film printing, mastering the heat press technique ensures professional-quality results every time. This guide will walk you through each step, from setting up your workspace to post-press care, so you can confidently create stunning custom apparel with DTF transfers. With the right tools, techniques, and a bit of practice, you’ll be able to produce eye-catching designs that stand out and last. Let’s get started and unlock the full potential of DTF heat transfers!
Table of Contents
ToggleEssential Tools and Materials
In order to achieve great results, there are some tools and materials necessary for DTF heat pressing. You will need a good heat press with high-quality heat press settings up to 320°F control having enough pressure control. What you will need: Parchment paper or Teflon sheets for protection, heat resistant tape, and a lint roller to prepare your garment. A household iron can work if you have a few small projects to do, however, a heat press is the best to assure the right temperature and pressure is applied. Extra materials you can have included DTF transfers, good fabrics, and measurement tools for placing.
Benefits of Heat Press DTF Transfers
Heat press DTF transfers offer significant advantages over traditional printing methods and transfer paper alternatives. The process creates vibrant, durable designs that withstand multiple wash cycles without fading or cracking. Unlike household iron applications, proper heat press settings ensure consistent results with firm pressure and precise temperature control. DTF transfers work on various fabric types, from cotton to polyester blends, making them incredibly versatile. The cold peel and hot peel options offer flexibility for different project needs. DTF transfers don’t require weeding or pre-treatment, saving you time so you can go from design to final product fast, providing custom apparel that looks and feels like screen-printed garments.
Steps for Heat Press DTF Transfers
Prepare Your Workspace
Before you begin, it’s essential to set up a clean, organized workspace to ensure a seamless heat press experience. Start by placing your heat press machine on a stable, heat-resistant surface, ensuring it’s level and secure. Gather all the necessary tools within arm’s reach, including your DTF transfers, a lint roller, a Teflon sheet, and the garment you’ll be pressing. Having everything ready beforehand not only streamlines the process but also minimizes the risk of errors, helping you achieve consistent, high-quality results. A well-prepared workspace is the foundation for successful DTF heat transfers, ensuring your designs come out vibrant, durable, and professional every time.
Preheat the Heat Press
Preheating your heat press is a critical step in the DTF transfer process, setting the stage for professional-quality results. Start by setting the temperature to the recommended setting (usually around 320°F) and allow the press to fully heat up. Consistent heat is essential because it ensures the DTF powder adhesive activates properly, creating a strong, durable bond between the design and the fabric. Before pressing, double-check the temperature and pressure settings to avoid under- or over-pressing, both of which can compromise the final print quality. Taking the time to preheat and verify your settings ensures your DTF heat transfers come out vibrant, sharp, and long-lasting, making every piece of custom apparel a standout success.
Prepare the Garment
Properly preparing the garment is a crucial step in achieving a flawless DTF transfer. Start by laying the garment flat on the heat press platen, ensuring it’s smooth and free of wrinkles. Use a lint roller to remove any dust, lint, or debris that could interfere with the adhesion of the DTF powder adhesive. If you’re working with delicate fabrics or materials prone to scorching, consider using a Teflon sheet as a protective barrier to prevent damage while ensuring even heat distribution. Taking the time to prepare the garment not only enhances the print quality but also ensures your DTF heat transfers look professional, feel comfortable, and last longer. A well-prepared garment is the foundation for creating custom apparel that stands out and withstands the test of time.
Position the DTF Transfer
Carefully position the DTF transfer on the garment, design-side down, ensuring it’s perfectly aligned with your desired placement. Use heat-resistant tape to secure the transfer in place, preventing it from shifting during pressing. Proper alignment is absolutely crucial, especially for multi-colored or intricate designs, as even a slight misalignment can affect the final look of your custom apparel. Take a moment to double-check the placement, ensuring the design is centered and straight before moving to the next step. This attention to detail ensures your DTF heat transfers come out polished, professional, and ready to impress. Whether you’re creating custom t-shirts, hoodies, or promotional items, precise placement is key to achieving flawless results every time.
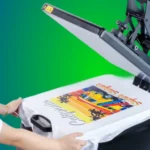
Apply the Heat Press
Once everything is in place, close the heat press and apply firm, even pressure for 10-15 seconds. The heat activates the DTF powder adhesive, creating a strong bond between the design and the fabric. Avoid lifting the press prematurely, as this can result in incomplete adhesion and compromise the durability of your DTF heat transfers. Consistent temperature and pressure are absolutely essential for achieving vibrant, long-lasting results that stand up to everyday wear and washing. Whether you’re creating custom t-shirts, hoodies, or promotional items, this step ensures your designs look professional and feel comfortable. Mastering the heat press technique is the key to unlocking the full potential of DTF transfers, giving you the confidence to create stunning custom apparel every time.
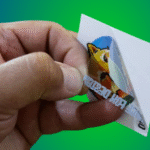
Peel the Carrier Sheet
After pressing, carefully peel off the carrier sheet while it’s still warm, using a slow and steady motion to avoid damaging the design. If the sheet feels difficult to remove, allow it to cool slightly before trying again—this prevents any risk of smudging or tearing. This step is where the magic happens, revealing your vibrant, high-quality print in all its glory. Whether you’re creating custom t-shirts, hoodies, or promotional items, this moment showcases the professional results of your DTF heat transfers. The sharp details and bold colors are a testament to the precision of direct-to-film printing, leaving you with a finished product that’s ready to impress. Take pride in this step—it’s the final touch that brings your creative vision to life!
Post-Press Care
To ensure your DTF transfer lasts, follow these post-press care tips:
- Allow the garment to cool completely before wearing or washing.
- Wash the garment inside out in cold water to preserve the design.
- Avoid using bleach or harsh detergents, as they can damage the print.
- If needed, post-press the garment again for 10-15 seconds to enhance durability.
Proper care ensures your custom apparel stays vibrant and durable, even after multiple washes.
Hot Peel vs. Cold Peel Methods
Understanding hot peel versus cold peel methods is crucial for optimal DTF transfer results. With a hot peel, you are going to peel the carrier within only a few seconds of the initial press, while the transfer is still hot. This also works well for your average DTF transfers, and is instantaneous. A cold peel involves putting the transfer down for 15 seconds to let cool, giving more adhesion and less risk of design damage. The majority of DTF transfers are for cold peel applications. The warm peel method falls between these two, removing the film when slightly cooled but still warm to the touch.
Achieving Long-Lasting Results with DTF Transfers
Maximizing results requires proper technique and post-application care. Start with correct heat press settings. 320°F with firm pressure for 10-15 seconds, followed by the appropriate peel method. Press again for a couple seconds with the parchment paper to cure the adhesive fully. Pre-press the item to remove moisture and wrinkles before applying. Do not use low temp settings, as the bond is not strong enough with low temp. After use, wait until the appliance cools. For washing, use cold water and turn garments inside out. This ensures your DTF transfers maintain their vibrancy and durability for years.
Troubleshooting Common Issues
Typical DTF transfer issues are easy to fix when you know how to troubleshoot. Many times poor application is a result of not using the correct temperature or pressure. Use 320°F for 20 seconds with firm pressure, not a low heat that is similar to an iron as it will not transfer the images properly. If transfer peel production is peeling too soon, check your peeling process to ensure it matches the transfer application. Uneven applications could be due to inconsistent pressure. Pre press the garment and check your heat press alignment. Design cracking indicates overheating, so try reducing the temperature slightly and shorten press time by a few seconds. When using parchment paper, ensure it’s heat-resistant. Unlike transfer paper methods, DTF requires precise timing and temperature for optimal results.
Conclusion
Mastering the art of heat pressing DTF transfers opens up a world of creative possibilities. From preparing your workspace to applying the perfect amount of temperature and pressure, each step plays a crucial role in achieving professional-quality results. Whether you’re creating custom t-shirts, hoodies, or promotional items, DTF heat transfers deliver vibrant, durable designs that stand out. Ready to take your skills to the next level? Explore our DTF gang sheet builder to streamline your workflow and create stunning, personalized designs with ease. With the right tools and techniques, you can transform any garment into a masterpiece!
FAQs
What Heat Press Settings for DTF Transfers?
Optimal heat press settings for DTF transfers are 320°F with firm pressure for 10-15 seconds. Use parchment paper protection and ensure your press distributes heat evenly. Avoid low heat settings and household iron alternatives for best adhesion and professional results.
How Do I Press a DTF Image?
Pre press the garment to remove moisture, position the DTF transfer face-down, then apply firm pressure at 320°F for 10-15 seconds. Use cold peel or hot peel method as specified, then perform a second press with parchment paper for a few seconds.
What Temperature Should DTF Be Pressed At?
DTF transfers should be pressed at 320°F for optimal results. This temperature activates the adhesive properly without damaging the design. Avoid low heat settings or household iron temperatures, which compromise adhesion and durability compared to proper heat press settings.
How Long Do You Press a DTF Transfer?
Press DTF transfers for 10-15 seconds initially, followed by a second press for a few seconds after peeling. This step by step guide timing ensures proper adhesive activation and curing. Shorter times may cause poor adhesion, while longer pressing can damage the design.